Git policy
In Datagrok, we think the project's development should be efficient and straightforward. With that in mind, we created a Git policy that enables time-effective development without losing end product quality. Always use it during development in the public repository.
Git Flow
We separated the Git Flow into two types: flow for experienced contributors and flow for general contributors.
Productivity tips for git
-
Configure the commit authorship. Set your name and email address correctly.
git config user.name "<Name> <Surname>"git config user.email "<email@address>" -
Keep your local branch up to date by frequently fetching changes from the remote server. It will prevent bugs, rework, and the tiresome resolution of conflicts. Start your work by fetching changes.
- Master branch
- Development branches
Do not create unnecessary merge loops. Always use the --rebase flag to pull changes from the
masterbranch.Set the git configuration to enforce rebase pull strategy for master branch. It is a one-time procedure.
git config --global pull.rebase falsegit config --global branch.master.rebase truegit config --global branch.main.rebase truegit config --global rebase.autostash trueThen you should be able to update master branch using simple
git pullcommand.For more information on how to work with git, check the detailed instructions in codeowners flow.
Fetch changes from
masterbranch to keep your code up-to-date.git pullgit merge origin/mastergit push -
Keep your branch name meaningful. Use the agreed standard:
<first letter of your name><your surname>/<task ID>/<meaningful short description>. Task ID should be a full ID from any task tracking system. For example,jdoe/GROK-123/descriptionfor Jira issues orjdoe/#123/descriptionfor GitHub issues. -
If git checkouts fail on Windows with an error "Filename too long", run the command below:
git config --system core.longpaths true
Codeowners flow
The codeowners are a small group of people with good knowledge of the code base, excellent development skills, and attention to detail. They have a right to push to the master branch skipping the creation of development branches, pull requests, code review, and all other steps required for general development. This way, codeowners can contribute directly to the project and get the profits of the accelerated development.
However, with great power comes great responsibility. The codeowners are responsible for the code review on pull requests to the master branch. They are the owners of the code quality of the project.
Detailed git instructions
-
Clone the repository if you do not have the local repository. It is a one-time procedure.
# git clone <repository_url>git clone https://github.com/datagrok-ai/public.git -
Change the branch to the master branch.
# git checkout <main_branch_name>git checkout master -
Pull the latest changes from the remote server. Start your work by pulling the changes from the remote server. It will prevent bugs, rework, and the tiresome resolution of conflicts.
git pull --rebase -
Make changes in the files.
-
Test the changes. You can use the datagrok toolkit to test packages
-
Add files to commit. We recommend not mixing refactoring with a new feature on one commit. The changes should be atomic with the exact purpose.
git add -p -
Create a commit with changes. Write descriptive and meaningful messages according to the commit message rules. Changelogs include all commit messages.
# git commit -m '<commit message>'git commit -m '[closes] <ticket ID>: <scope>: <subject>[optional description]' -
Push the commit right after the creation. Pushing one commit at a time helps to avoid unexpected GitHub Actions behavior.
git push
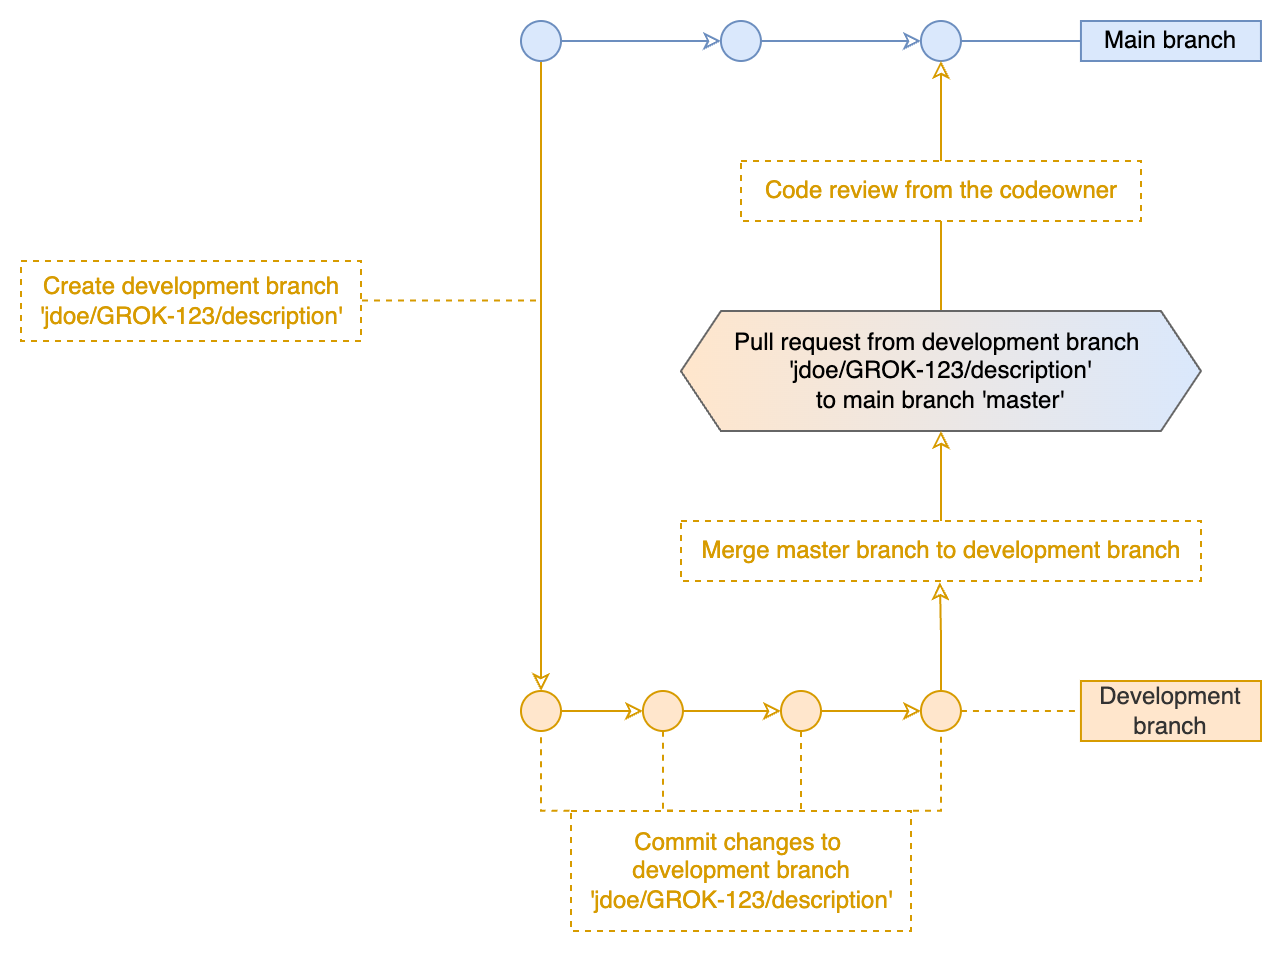
General flow
The general contributors first push code to the branches and get a code review from the code owner. Then, the code owner merges the changes to the master branch. Pushing straight to the master branch is forbidden for general contributors. They have to follow the full git flow, which is quite similar to the trunk-based development flow.
Detailed git instructions
-
Clone the repository if you do not have the local repository. It is a one-time procedure.
# git clone <repository_url>git clone https://github.com/datagrok-ai/public.git -
Change the branch to the master branch.
# git checkout <main_branch_name>git checkout master -
Pull the latest changes from the remote server. Start your work by pulling the changes from the remote server. It will prevent bugs, rework, and the tiresome resolution of conflicts.
git pull -
Create a git branch. It would be best to name it according to the task; the name must be meaningful. Use the agreed standard:
<first letter of your name><your surname>/<task ID>/<meaningful short description>. Task ID should be a full ID from any task tracking system. For example,jdoe/GROK-123/descriptionfor Jira issues orjdoe/#123/descriptionfor GitHub issues.# git checkout -b <first letter of your name><you surname>/<task ID>/<meaningful short description>git checkout -b jdoe/GROK-123/description# git push –set-upstream origin <first letter of your name><you surname>/<task ID>/<meaningful short description>git push --set-upstream origin jdoe/GROK-123/description -
Make changes in the files.
-
Test the changes. You can use the datagrok toolkit to test packages
-
After all the required changes are made, merge changes from the master branch to your branch. Fix all the conflicts if it is required. Push the merged changes right after the merge.
git pull# git merge origin/<main_branch_name>git merge origin/master# Push changes immediately after merge. This is very important to avoid conflicts in the future.git push -
Add files to commit. We recommend not mixing refactoring with a new feature on one commit. The changes should be atomic with the exact purpose.
git add -p -
Create a commit with changes. Write descriptive and meaningful messages according to the commit message rules. Changelogs include all commit messages. If all the commits have descriptive messages, there will be no need to rewrite the message during a merge.
# git commit -m '<commit message>'git commit -m '[closes] <ticket ID>: <scope>: <subject>[optional description]' -
Push the commit right after the creation. Pushing one commit at a time helps to avoid unexpected GitHub Actions behavior.
git push -
Repeat steps 5-9 until you get the expected result
-
Create a pull request from your branch to the master branch and ask for a review from Code Owner.
-
After the approval, merge the pull request using the 'Squash and merge' option. All changes from the development branch will be merged into the master branch as one squashed commit. Check and rewrite the commit message if needed. The commit message must meet the commit message rules. Changelogs include all commit messages.
-
Repeat 2-12 steps every time you start working on a new task
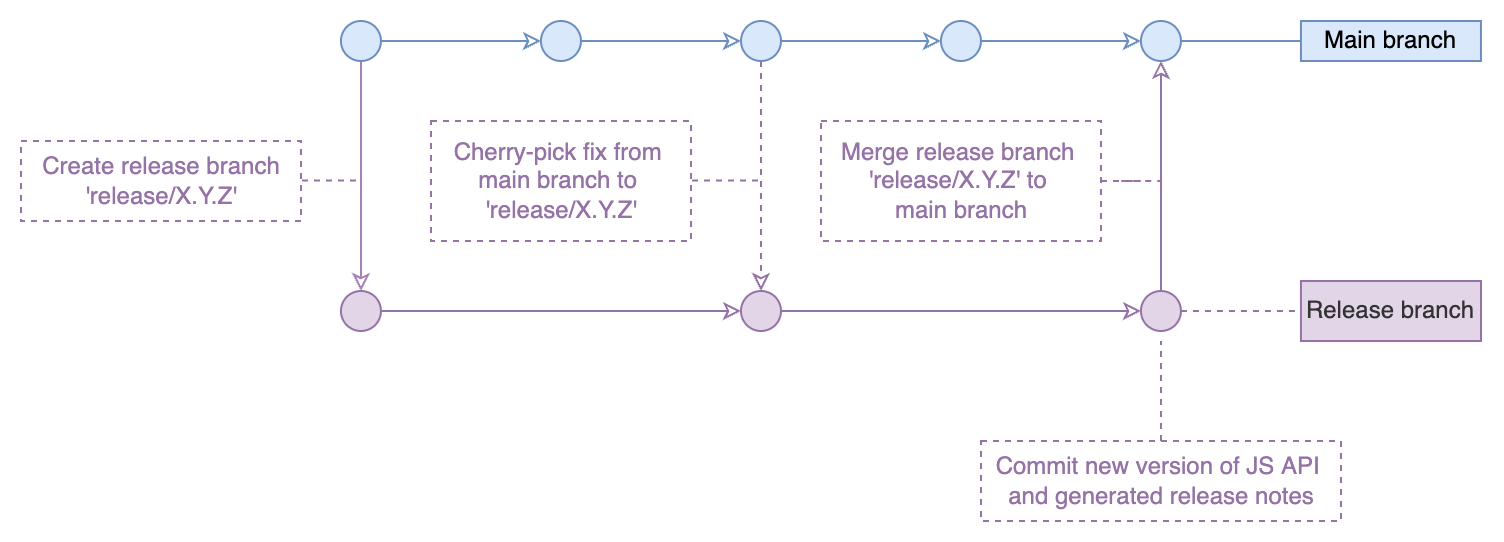
Release flow
The new branch release/X.Y.Z is created during the release of the latest version of the platform. The release branch
is required to create a stable and reliable release of public Datagrok JS API
and Datagrok Docker image. After the tests and approvals, the CI/CD
tool bumps the version of JS API
and Datagrok Docker image. Then it generates the release notes for the new
version. The version of JS API
coincide with the Datagrok Docker image version. Commit with new version,
and release notes should be cherry-picked from the release branch to the master branch.
All the procedures are performed automatically by CI/CD tool.
For now, there is no need in the release branch for any software other than JS API and Datagrok Docker Image.
Detailed git instructions
-
Clone the repository if you do not have the local repository. It is a one-time procedure.
# git clone <repository_url>git clone https://github.com/datagrok-ai/public.git -
Change the branch to the master branch.
# git checkout <main_branch_name>git checkout master -
Pull the latest changes from the remote server.
git pull -
Create a release branch. Name it according to the release:
release/<release number>. For example,release/1.2.3# git checkout -b release/<release number>git checkout -b release/1.2.3# git push –-set-upstream origin release/<release number>git push --set-upstream origin release/1.2.3 -
Run the release job in CI/CD tool.
-
If any test has failed and the changes are required, make changes in the master branch and then cherry-pick them to the release branch.
git pull# git cherry-pick <commit with required changes>git cherry-pick 123456789abcdefghijklmnopqrstuvwxyz -
Restart the release job in CI/CD tool.
-
Repeat steps 5-6 until you get the expected result. The release job should complete successfully and push the new version and release notes to the release branch.
-
Cherry-pick the commit with the new version from the release branch to the master branch
# Pull changes in the release branchgit pullgit checkout master# Pull changes in the master branchgit pull# git cherry-pick <commit with version change and release notes from release branch>git cherry-pick zyxwvutsrqponmlkjihgfedcba987654321 -
Repeat 2-9 steps every time you start working on a new release
Commit message policy
In the repositories, we follow the convention, which is very close to Conventional Commits specification and based on Angular Commit Message Guidelines. It provides an easy set of rules for creating an explicit commit history which is easier to follow. Also, we built automation on top of commit messages which generates release notes based on tickets from task trackers and commit messages. The most important part of a commit message is that it should be clear, meaningful, and descriptive. Use your common sense for controversial aspects which are uncovered in the documentation. The Conventional Commits scheme is fully documented on the official website; below is our cheat sheet to help you understand the basics of committing to our products.
Commit message rules
Each commit message consists of a header and a body structured as follows:
[closes] <ticket ID>: <scope>: <subject>

[optional description]
Every line in the commit should be 70 chars or less.
Samples
GROK-123: JS API: Update rxjs dependency version

Fix the CVE-0000-99999 vulnerability of old version rxjs in
JS API package.json
https://community.datagrok.ai/t/topic-for-dependency/000
closes #123: Chem | Descriptors: New super incredible feature release

BREAKING CHANGE: deleted the method superCool in chem.ts
GROK-456: GitHub Actions: Change in the release notes generation flow
#456: Library Bio: Create documentation for package usage (WIP)
Commit header
The header is an essential part in the commit message. It should be 70 chars or less.
[closes] <ticket ID>: <scope>: <subject>
Example:
GROK-321: Grok Connect: Fix vulnerability in Postgres provider (WIP)
closes #321: Grok Connect | Postgres: Fix vulnerability in provider
Ticket ID (references in commitlint)
The ticket ID is highly recommended in the commit message. If there is a ticket, mention it in the commit message. The ticket ID is a complete id from Jira or GitHub. The change type for release notes will be determined by ticket type, such as Bug or Feature.
Commits without ticket ID won't be included to release notes
Example:
GROK-1234- Jira issue in GROK project#1093- GitHub issue
Scope
The scope is REQUIRED in the commit message. Use the software name that was changed as scope. For example, the scope for package-specific changes is the package name.
Example:
JS APIBioChemLibrary BioToolsGrok ConnectGitHub ActionsHelp- etc.
Subject
The subject is REQUIRED in the commit message. The subject is a succinct description of the change. In most cases, the ticket name will suit the subject.
Commit body
The body is OPTIONAL in the commit message. Every line in the body of the commit should be 70 chars or less. The body is
a detailed description of the change; It is needed if the subject is not enough to express the change.
For example, add a link to the community forum topic to the body.
If you need to break the behavior of the existing functionality in the JS API, library, or package API, add BREAKING CHANGE: <description what change breaks> to the body.
<BLANK LINE>
<optional description>
Example:
Fix the Uncontrolled Resource Consumption vulnerability in log4j
dependency for Grok Connect (CVE-2021-44228)
Commit linting
Every commit MUST be checked by commitlint on pre-commit hook.
Installation
npm install --location=global @commitlint/config-conventional @commitlint/cli
pip install pre-commit
pre-commit install --install-hooks --hook-type pre-commit --hook-type commit-msg
Every commit is checked in GitHub Actions and reported broken if it does not apply to the commit message rules