Developer exercises
These programming exercises are designed to help developers get proficient with the Datagrok platform. The exercises are organized as progressive steps, with tasks of increasing complexity built on top of the previously completed steps.
During this course, we will be building support for handling DNA nucleotide sequences. Let that not scare you, think of
them as regular strings that can only contain characters G, A, C, and T (and now you know the origins of the
"Gattaca" movie name) and the 'fasta: ' prefix to avoid conflicts. We will start with writing standalone functions, then automatically recognizing nucleotide
sequences in the imported data, and then going all the way to custom visualizations, relational databases querying,
predictive models, integration with the external utilities, data augmentation, and custom applications.
Table of contents
- Setting up the environment
- Semantic types
- Scripting and functions
- Composing functions
- Querying databases
- Reading files
- Creating a scripting viewer
- Transforming dataframes
- Custom cell renderers
Setting up the environment
Prerequisites: basic TypeScript or JavaScript knowledge.
Useful links:
- Install the necessary tools (Node.js, npm, webpack, datagrok-tools) following these instructions
- Create a branch from master at GitHub or using your IDE; Use your credentials as a name of the branch
- Get a dev key for Dev Server (you will work with this server) and add it by running
grok config. Open https://dev.datagrok.ai/u, click onDeveloper key, copy thegrokcommand and execute it to add the key to your config - Create a default package in your branch called
<yourFirstName>-sequenceusing datagrok-tools:grok create <yourFirstName>-sequencewith specifying the--tsoption to create a package with TypeScript configuration (if you are new to TypeScript, you can specify the--jsoption); Note that detectors.js file should be in JavaScript anyway. Also you can add--eslintoption to add eslint checker feature to the package - Run
npm installto link the dependencies mentioned inpackage.jsonfile of your package - Upload it to the server: run
webpackandgrok publish dev(see other options here) - Launch the platform and run the package's
info()function using different methods:
- via the Functions view
- via the Packages menu (find your package, click on it and run
info()from theFunctionspane in the context panel on the left) - via the console: press
~key anywhere inside Datagrok, the Console will appear to the right; execute<loginName>Sequence:info()there. The identifier used as package name (before ':') will be obtained by transformation kebab style of folder name to camel style, or can be specified directly with attributefriendlyNameinpackage.jsonfile.
As a result of the function execution you should see an info notification with url of package's webRoot.
Exercise 1: Semantic types
Prerequisites: basic TypeScript or JavaScript knowledge.
Details: Parameter annotation, How to define semantic type detectors, How to add an info panel.
You will learn: how to write semantic type detectors, how to develop context-specific data augmentation.
-
Create a
complementfunction insrc/package.tswhich takes a nucleotide string and returns its complement://name: complement//input: string nucleotides//output: string resultexport function complement(nucleotides): /*type*/ {// your code goes here}Note that comments on the top of the function declaration are crucial for running it on the platform. They determine the function name, the input and output types.
Essentially, change each character to the complementary one:
A <=> T,G <=> C. Run it and check whether everything works fine. -
Now, let's specify that this function is meant to accept not any string, but nucleotides only, and to return a nucleotide string as well. In order to do that, let's annotate both input and output parameters with the
dna_nucleotidesemantic type://input: string nucleotides {semType: dna_nucleotide}//output: string result {semType: dna_nucleotide}At this point,
dna_nucleotidestring does not have any meaning, but we will connect the dots later. -
Define a
detectNucleotidessemantic type detector function as part of the specialdetectors.jsfile.class <yourFirstName>SequencePackageDetectors extends DG.Package {//meta.role: semTypeDetector//input: column col//output: string semTypedetectNucleotides(col) {// your code goes here}}It should check whether a column is a string column, and whether each string represents a nucleotide. If condition is met, it should return
"dna_nucleotide"string.For best performance, don't iterate over all column values, instead iterate on
column.categories. Full Datagrok Column type API could be found here. -
Upload your package to
dev.datagrok.aiusinggrok publish devcommand. When everything is done correctly, thedetectors.jsfile will get loaded by the platform automatically, and thedetectNucleotidesfunction will be executed against every column in a newly added table. -
Reload the
dev.datagrok.aipage to use updated version of your package. -
Test your implementation by opening the following CSV or TXT file (or go to
📁 (Data) | Textand paste it there). Make sure you click on DONE (this will trigger semantic types detection):sequence, idfasta: GATTACA, 1997fasta: ATTCGGA, 1984fasta: TTTAGGC, 2021Hover over the
sequencecolumn header after the data is imported — if everything is done correctly, you will seequality: dna_nucleotidein the bottom of the tooltip: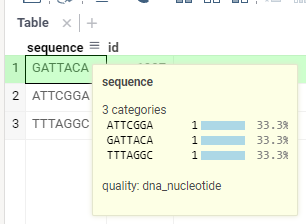
Alternatively, you can find this information if you click on the column and expand the 'Details' pane in the property panel on the right.
-
Now let's put the result of the previously created
complementfunction into an info panel: Create functioncomplementWidgetand add special comments block to allow Datagrok system recognize it and upload properly (see an example here).//name: complementWidget//meta.role: panel, widgets//input: string nucleotides {semType: dna_nucleotide}//output: widget result//condition: trueThe
panelandwidgetsroles and output typewidgetallows Datagrok to determine how the result ofcomplementWidgetfunction will appear in the system. Listed above block of comments will instruct the platform to use thecomplementWidgetfunction for providing additional information for string values of thedna_nucleotidesemantic type. To test it, simply open our test file, click on any cell in thesequencecolumn, and find thecomplementWidgetproperty in the panel on the right as it is shown on screenshot:
Exercise 2: Scripting and functions
Scripting with server functions
Prerequisites: basic Python knowledge.
Details: Scripting, Dev Meeting 1 | First-class functions
You will learn: how to create and invoke Datagrok scripts in data science languages like R and Python.
In this exercise, we will count occurrences of a given subsequence in a nucleotide sequence, using Python.
-
Open Datagrok and navigate to
Functions | Scripts | Actions | New Python Script. -
Observe a default script created for you. All script attributes are specified in the beginning in comments. There we have the script name, language, one input value of type
dataframe, and one output value of typeint. The script simply computes number of cells in the dataframe. Dataframe is a high-performance, easy to use tabular structure with strongly-typed columns of different types (supported types are:string,bool,int,bigint,double,qnumanddatetime). In this exercise, we only see a dataframe as is in the default script; there is another exercise to learn manipulating dataframes in JavaScript. -
Run the script to get a hint for creating an input file. An attribute
#sample: cars.csvis responsible for it. To open a default input filecars, click theStaricon in the top menu. -
Run the script again and proceed to the Datagrok's console. As in Quake, it's available by pressing a
~button anywhere inside Datagrok. In the console, you would see the script execution result. Just one line above the result you could see the console's command to execute the script. Enter it again to the console to get the same result (but in console you should specify script with namespace prefix as<yourLogin>:<script_name>). -
Let's modify the script to solve the task of counting sequence occurrences. Add a new preamble: (use any
#descriptionyou like):# name: CountSubsequencePython# language: python# input: string sequence# input: string subsequence# output: int countIn the body, implement a Python function counting all occurrences of a given
subsequencein asequence. Return acountthe same way as in the default script from p. 2. -
Run the script function, provide input values in the dialog and get to the console to see the result. Now run the script function again through the console completely, passing different arguments values:
<yourLogin>:CountSubsequencePython('ATGATC', 'A'). You can find your login inside the profile page between name and email (under avatar), or in the profile URL:https://dev.datagrok.ai/u/<yourLogin>/summary. -
Let's apply
CountSubsequencePythonto the input dataframe using Datagrok UI. Open a table — say, let's go forsars-cov-2.csv. Navigate toData | Filesand openDemo Files / bio / sars-cov-2.csv. Navigate to a menu itemEdit | Add New Column...and click it. Type in your expression using the function you've just previously created: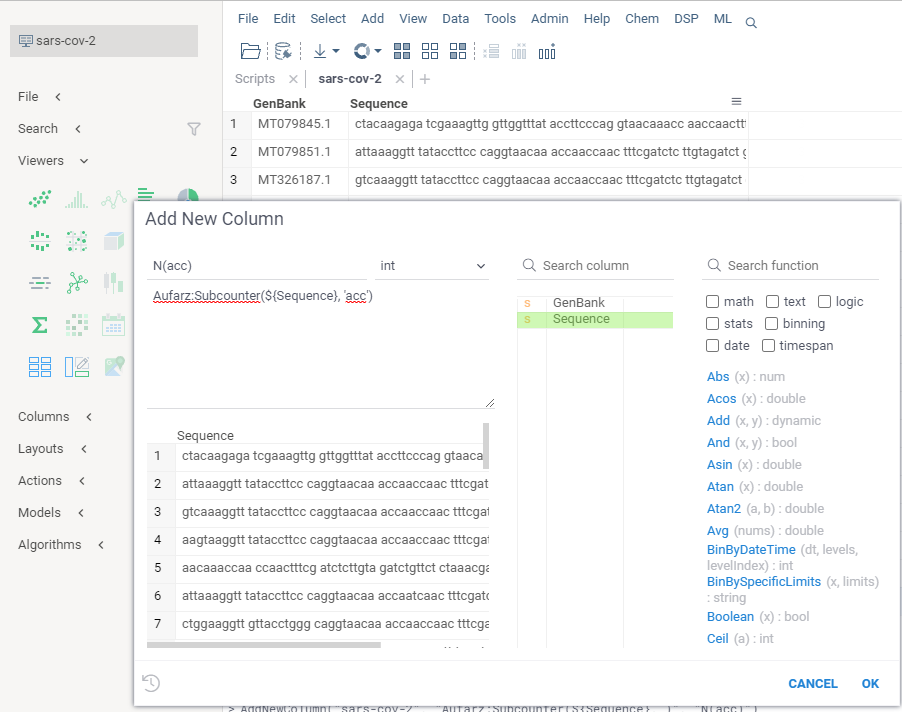 Observe how the
 Preview Result Columnschange while you are modifying the expression. There, notice a namespace<yourLogin>as part of a qualified function name<yourLogin>:<functionName>,JDoe:CountSubsequencePythonin this case. Namespaces are used through Datagrok very commonly. In general, there shall be no case where you would call a function without specifying a namespace. Datagrok namespaces originate from the names of packages, projects, and users, and always qualify a resource name, be it a package, a function, a connection or a query. Now hit "Ok" and have the new column inserted to the dataframe.
Modifying dataframes with scripts
Prerequisites: basic Python knowledge.
You will learn: how to manipulate tables, which we usually call dataframes, using a server scripting language, expand dataframes with newly computed values, and modify the dataframes.
In the previous exercise we learnt a fast method to apply a function to a table and produce a new column in it. Another means to introduce new columns to the dataframes is to programmatically manipulate dataframes right in scripts. Let's repeat what we've achieved in the last point of the previous exercise, now with more scripting.
-
Let's create a different kind of our
CountSubsequencePythonfunction, now calledCountSubsequencePythonDataframe. While the original function could only operate on a single row, the new function shall operate on the entire dataframe. To start with, the function's Datagrok signature should look as follows:# name: CountSubsequencePythonDataframe# language: python# input: dataframe sequences# input: column columnName# input: string subsequence = "acc"# output: dataframe result {action:join(sequences)}This function takes as an input a dataframe with a column containing nucleotide sequences, named as a value of
columnName, a nucleotide subsequencesubsequencebeing sought, and outputs an input dataframe with a new column appended to it, containing numbers of subsequence occurrences in the nucleotide sequences. Say, for a table on the left the following table on the right should be produced for a subsequenceaccbeing sought:GenBank ID MT079845.1 fasta: ctacaagaga MT079851.1 fasta: attaaaggtt MT326187.1 fasta: gttctctaaa GenBank ID N(acc) MT079845.1 fasta: ctaccagaga 1 MT079851.1 fasta: attaaaggtt 0 MT326187.1 fasta: gttctctacc 1 -
Implement a function
CountSubsequencePythonDataframe. Assume theresultis a Python dataframe with just this one columncolumnName. After theresultcolumn is computed and returned from the server to the client, based on thejoininstruction,resultwill be appended to the existing input dataframesequences. As this is performed purely on the client, we save the bandwidth without needing to return a copy of a dataframe which we already passed to the server.- Use Pandas dataframes as
pdto access the input dataframe and create an output dataframe - You don't need to import
pandas, Datagrok does this automatically: to each Python script it adds a preamble with most popular imports (os,io,json,pandas as pd,requests,datetime,timedelta) - Note that the column
columnNameis just a string with a column name passed to a script, not an actual column content
- Use Pandas dataframes as
-
Run the function with a "Play" button on top of the function window. The dialog will prompt you to select a dataframe. Navigate to a "Data" view (first button on the left sidebar) and open a file with nucleotide sequences (say,
Demo Files / bio / sars-cov-2.csvavailable at public.datagrok.ai). Go back to theRun Functiondialog to select the opened dataframe. -
Now choose a column with nucleotide sequences from the dropdown. Notice how the list of columns is automatically formed for the selected dataframe. Finally, run the function to get the resulting dataframe.
-
As for modifying the dataframes in general, just consider removing the
{action:join}option and do whatever is needed to the output dataframeresultbefore the end line of the script. This will return exactly theresultdataframe after all modifications. -
Consider that the function may have several outputs. In case you return two dataframes, both will appear in the Datagrok interface. There's also a special syntax in Datagrok JS API to call functions which return several parameters, we'll review this in one of the following exercises.
Scripting with client functions
Prerequisites: basic JavaScript knowledge.
You will learn: how to create and invoke Datagrok JavaScript scripts.
- Go to
Functions | Scriptsand hitNew JavaScript Script. - Implement the function
CountSubsequenceJSin JavaScript, which does the same asCountSubsequencePython. Follow the same conventions on the parameters in the comments block and returning a result via a variable. - Run
CountSubsequenceJSusing thePlaybutton; using the console. From same console, runCountSubsequencePythonyet again. You can notice that both Python and JS versions of our function, implemented as scripts, are homogeneous functions in Datagrok. It's also possible to call them in a uniform fashion using our JavaScript API. - Don't forget to save these two scripts. We would re-use parts of them in the following exercises.
The difference between the two scripts is that the first, CountSubsequencePython, runs on our server by a
compute virtual machine, whereas the second, CountSubsequenceJS, runs
directly in the browser. To run CountSubsequencePython, Datagrok passes the script arguments over the network and
fetches back the result to the browser.
Exercise 3: Composing functions
Prerequisites: basic Python and TypeScript/JavaScript knowledge.
You will learn: how to invoke functions via JS API, find functions by their metadata, and compose functions.
-
Create a folder called
scriptsunder your package root. Find the scriptCountSubsequencePythoncreated for the Scripting exercise and add it to this folder. -
Publish your package and try calling your script from the console:
<PackageName>:CountSubsequencePython("fasta: gttctctacc", "acc")noteIf you already have scripts with the same names saved on the platform, those from the package will have a suffix
_1(this can be checked inLinks...in the script details in the context panel).To provide scripts as part of a package, use the
scriptsfolder. This is one of special directories reserved for specific package content (learn more about package structure). -
Now let's try calling a script via JS API. Add a new function to
src/package.ts. It should call your Python script with specified arguments and return the result of the following expression:grok.functions.call(`${packageName}:${scriptName}`, { params });This expression can be used to call any function (including commands you see in the platform console, scripts, queries, functions from external packages, and so on). The first argument is a fully-qualified function name (in your case, a namespace corresponds to a package name); the next argument is an object with parameters (make sure that they correspond to the input names in the script annotation, e.g.,
{ sequence: 'fasta: gttctctacc', subsequence: 'acc' }). You can also control the progress indicator during the call (see the API reference for call).tipYou can generate such wrapper functions for your scripts and queries by calling the
grok apicommand in your package directory (see datagrok-tools docs).Example
export async function countSubsequencePython(sequence: string, subsequence: string): Promise<number> {return await grok.functions.call('ExercisesPackage:CountSubsequencePython', { sequence, subsequence });} -
Read instructions for package testing and add several tests to the
CountSubsequencePythonscript annotation. Publish you package and check that tests run successfully in the Test Manager, or by calling thetestfunction of your package.noteAnnotation tests have a limitation on the number of output parameters in the script. To test a script with multiple outputs, get it via
DG.Func.findand use thegetParamValuemethod to obtain each output parameter by its name from the function call (refer to the Scripting article for details). -
We can use API methods to take the
CountSubsequencePythonDataframescript one step further. First, let's give a proper name to a new column. Create a wrapping function forCountSubsequenceTableAugmentinsrc/package.ts://name: CountSubsequenceTableAugment//input: dataframe sequences//input: column columnName//input: string subsequence = "acc"export async function countSubsequenceTableAugment(sequences: DG.DataFrame, columnName: DG.Column, subsequence: string): Promise<void> {const df = await grok.functions.call('ExercisesPackage:CountSubsequencePythonDataframe', { sequences, columnName, subsequence });const countCol = df.columns.byIndex(0);countCol.name = `N(${subsequence})`;sequences.columns.insert(countCol);}noteThe
{action:join}option is no longer necessary in the output parameter of the script as we augment the original dataframe in the above function. However, you can try to achieve the same effect in the script (see the implementation below for self-check).Python implementation
#language: python#input: dataframe sequences#input: column columnName#input: string subsequence = "acc"#output: dataframe result {action:join(sequences)}result = pd.DataFrame()result[f'N({subsequence})'] = sequences[columnName].apply(lambda x: x.count(subsequence)) -
Publish your package and prepare a visual layout before running the script. Navigate to
Data | Filesand openDemo Files / bio / sars-cov-2.csv. Run the script and check that a new column appears in the grid.
Exercise 4: Querying databases
Prerequisites: basic SQL knowledge
Details: Connecting to Databases, How to Access Data
Note: Editing an existing data query requires the respective access permission. You might need to request one.
In this exercise, we will work with a northwind PostgreSQL database (in case the name sounds familiar, this is a demo
database that Microsoft often uses for showcasing its technology). The database is already deployed and is accessible
from our server.
-
Navigate to the
Data | Databases | PostgreSQL | northwind | Schemas | public | orderstable -
Make this table current by left-clicking on it, and explore its context panel on the right. The
Contentpane should be showing first 50 rows of that table. -
Right-click on the table, and choose
New SQL Query... -
Execute the query and make sure it returns results.
-
Modify the query to accept a
countryparameter, and return the sum of freights for the specified country, grouped bycustomerid:--input: string countryselect customerid, sum(freight)from public.orderswhere shipcountry = @countrygroup by customerid -
Run the query, enter one of the countries in the input box (such as
USA, without quotation marks or apostrophes). Run it the second time, notice that previously entered parameters could be quickly reused by clicking on the watch icon in the left bottom corner of the dialog window. -
Rename this query from your name to
ordersByCountry, and save it. -
Try different ways to execute it:
- Right-click on
Data | Databases | PostgreSQL | northwind | ordersByCountry, selectRunfrom the context menu, enter the country name, and run it - Click on
Data | Databases | PostgreSQL | northwind | ordersByCountry, expand theRunpane on the right, enter the country name and run it - Open console by pressing
~key, see the results of the previous invocations. Copy-paste the corresponding command and run it from the console.
- Right-click on
-
Now, let's add this query to our package. Create a connection by running
grok add connection <yourFirstName>, then, as instructed here, update credentials, create the '.sql' file under thequeriesfolder, and paste our query there. Give it a name by adding the--name: ordersByCountryline on top of it.For examples of how to define different connections, check the Samples package.
-
Deploy the package, launch the platform, find the query in the package, and run it.
-
Create a JavaScript function (in
src/package.js) that has no parameters and returns a dataframe with the results of theordersByCountry('USA')call://name: getOrders//output: dataframe dfexport async function getOrders() {return await grok.data.query(`${packageName}:${queryName}`, { country: 'USA'});}There is another way to pass a country name to the query: you can provide a default value for the input parameter (see examples in the article Parameterized Queries).
Exercise 5: Reading files
Prerequisites: basic TypeScript/JavaScript knowledge
Details: How to access data, How to work with package files
You will learn: different ways to read files programmatically
-
In previous exercises, we opened the test file
Demo Files > bio > sars-cov-2.csvfrom the UI. Let's now write a function that opens a file by its path programmatically. Firstly, add this to your package://input: string filepath//output: dataframe dfexport async function openTable(filepath: string): Promise<DG.DataFrame> {}There are several methods you can use to open a table. For demo files, the simplest way is grok.data.getDemoTable. For files outside of the
Demo:Filesfile share, you can use grok.data.files.openTable, or execute a commandOpenServerFilevia grok.functions.eval (to see how it works, open a file from the UI and find the last console command, it will look similar toOpenServerFile("Demo:Files/bio/sars-cov-2.csv")).Assume that the inputs will be demo files only. Make sure to open a table view using
grok.shell.addTableView(df)before you return the dataframe from your function. -
Publish your package and test the function with the following inputs:
openTable("bio/sars-cov-2.csv");openTable("geo/earthquakes.csv");openTable("demog.csv");Function implementation
//input: string filepath//output: dataframe dfexport async function openTable1(filepath: string): Promise<DG.DataFrame> {const df = await grok.data.getDemoTable(filepath);grok.shell.addTableView(df);return df;}//input: string filepath//output: dataframe dfexport async function openTable2(filepath: string): Promise<DG.DataFrame> {const df = await grok.data.files.openTable(`System:/${filepath}`);grok.shell.addTableView(df);return df;}//input: string filepath//output: dataframe dfexport async function openTable3(filepath: string): Promise<DG.DataFrame> {const df = (await (grok.functions.eval(`OpenServerFile("System:DemoFiles/${filepath}")`)))[0];grok.shell.addTableView(df);return df;} -
Now let's see how to load external files by URL. Run a code snippet: stock-prices. We will see another application of the
grok.data.loadTablemethod in one of the next steps. -
Create a folder
filesin your package. Download the demographics dataset and cars dataset. Add these files to the new folder. Also, put several files with another extension there, e.g. aspirin mol file. -
Write a function that works with files distributed with your package. It should add all tables from the
filesfolder to the workspace://name: Add Tablesexport async function addTables(): Promise<void> {// Recursively list package filesconst files = await _package.files.list('', true);// Filter files by extensionconst csvFiles = files.filter((f) => f.extension === 'csv');// Load every table and add a view for itfor (const file of csvFiles) {const df = await _package.files.readCsv(file.name);grok.shell.addTableView(df);// Alternative ways to read a table are:// const df = await grok.data.loadTable(`${_package.webRoot}${file.path}`);// const df = await grok.data.files.openTable(`System:AppData/${_package.name}/${file.fileName}`);}} -
Publish your package. Find your files in the files browser: open
Data > Files > App Data > <PackageName>. Don't open the files from the UI, though. Call theaddTablesfunction in order to test your code. This is how you can work with package files in your applications.
Exercise 6: Creating a scripting viewer
Prerequisites: basic Python knowledge, matplotlib or a similar library
Details: Scripting , Scripting Viewer, Creating a scripting viewer (video).
Amino acids counting task. In this exercise, we'd use a Python script to generate a histogram (a distribution plot)
for amino acids occurring in a column of nucleotide sequences. Amino acids are simply triples of nucleotides from which
the nucleotide DNA sequence is made of. These are also called triplets, or codon-codes. As there are 4 letters G, A,
T, C, there are 4 to power 3 protein amino acids: GTA, AGC, TTT, and so forth.
We don't know at which starting point each nucleotide sequence was cut: it could either be a junction of two triplets, or one-third or two-third of a triplet. Therefore, we'd count in our statistics for all three possible cuts, starting the reading frame off at offsets 0, 1, and 2 from the beginning of the nucleotide sequence.
Say, we are given a sequence fasta: TTTAATTACAGACCTGAA. We start to count triplets without overlap from an offset 0 first,
getting: TTT, AAT, TAC, ..., GAA. Then we move to the offset 1, getting: TTA, ..., CTG. Lastly, we move
to the offset 2 and get: TAA, ..., TGA. In the histogram we'd count for all these triplets.
First, let's explore how scripting viewer works.
-
Open a
demogdemo file with demographic data. It is located atData | Files | Demo Files | demog.csv.Datacorresponds to the first button from the top of the Datagrok sidebar. Make sure the table view with the data appears. -
Activate the top menu from the sidebar, using a
Windows | Menuswitch. 3. In this menu, hitAdd | Scripting Viewers | New Scripting Viewer. -
See that the viewer appeared on the right, telling though it is "Unable to plot with current settings".
-
Proceed to the viewer properties by hitting on the gear icon in the viewer's title.
-
Make sure the chosen values for "Data" are
HEIGHTforX,WEIGHTforY, andAGEforColor. After checking this you should see a nice scatter plot forWEIGHTandHEIGHTwith the color corresponding toAGE: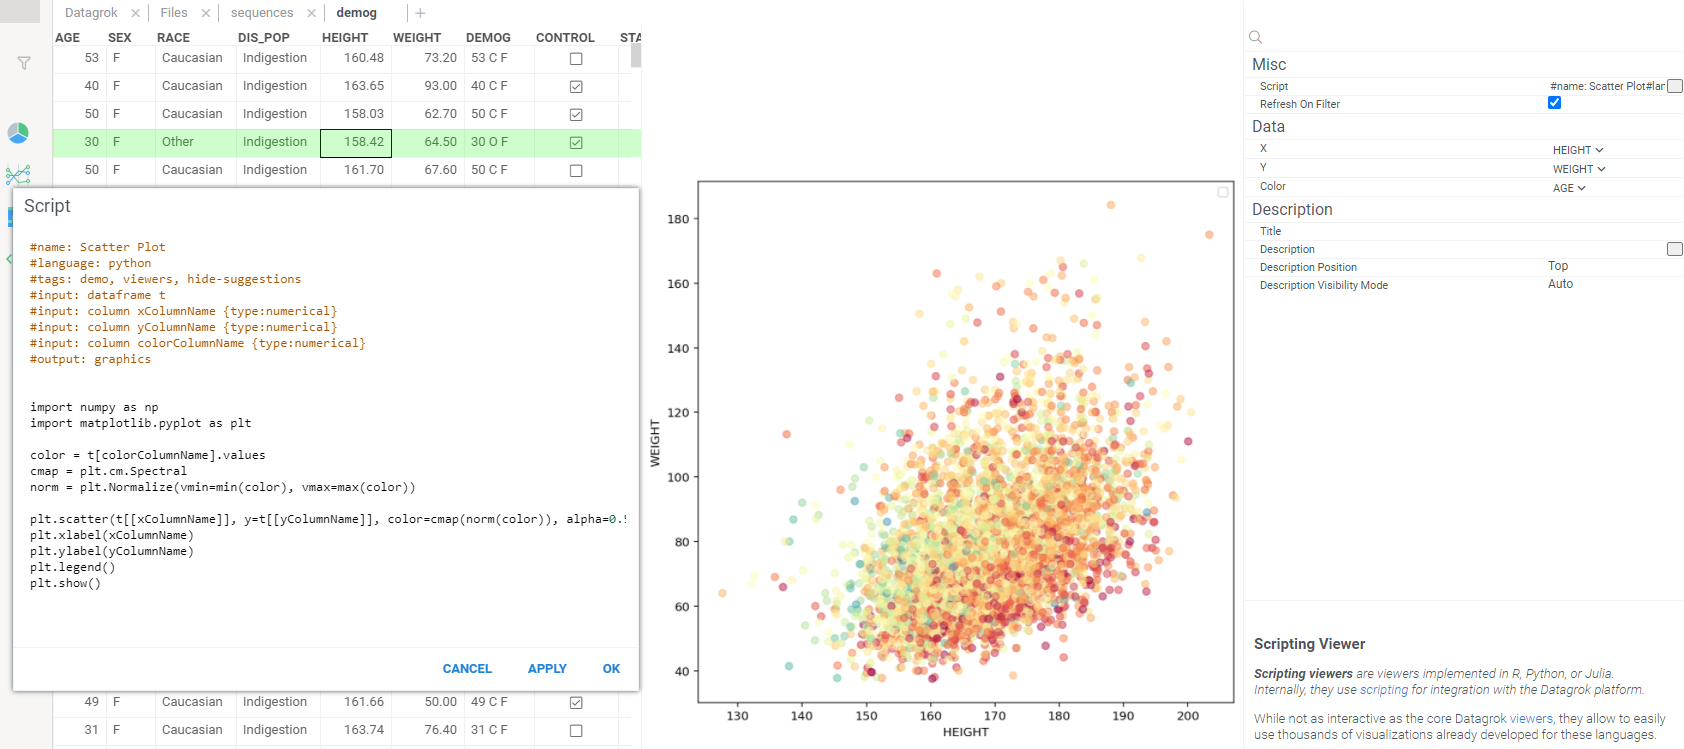
-
In the context panel, proceed to modify the value of the "Script" field by clicking on a "..." icon in the text field.
-
Enter the next code to the script editor:
#name: Scatter Plot#language: python#tags: demo, viewers#input: dataframe t#input: column xColumnName {type: numerical}#input: column yColumnName {type: numerical}#input: column colorColumnName {type: numerical}#output: graphicsimport numpy as npimport matplotlib.pyplot as pltcolor = t[colorColumnName].valuescmap = plt.cm.Spectralnorm = plt.Normalize(vmin = min(color), vmax = max(color))plt.scatter(t[[xColumnName]],t[[yColumnName]], color = cmap(norm(color)), alpha=0.5)plt.xlabel(xColumnName)plt.ylabel(yColumnName)plt.show() -
The Python code you see is what renders the scatter plot form p.6 on the Datagrok server. Let's walkthrough this code.
- The script takes as inputs the original dataframe and the three columns. Remember form p.6 there were selectors
for
X,Y, andColorin the context panel. In fact, these three property names are declared with the notation<propertyName>ColumnNamein the names of the three#inputcolumns. - The script produces an
#outputof typegraphics. It is important the graphics appear in the end of the Python script. This is exactly what happens with theplt.show()in the last line of the script.
- The script takes as inputs the original dataframe and the three columns. Remember form p.6 there were selectors
for
-
Modify the name of
colorColumnNameto atemperatureColumnName, hitApplyin the bottom of the window, and check what happens to theColorfield in the context panel. -
Add another input parameter to the script with a name
Title. HitApplyand check what appears in the property panel. -
Add another input column to the script with a name
SEX. HitApplyand check what appears in the context panel. -
Now there's all you need to create a Python scripting viewer for our amino acid histogram task. Open a demo file with nucleotide sequences. It is located at
Data | Files | Demo Files | bio | sars-cov-2.csv.Datacorresponds to the first button from the top on the Datagrok sidebar. -
In the top menu you've activated at p.2, hit
Add | Scripting Viewers | New Scripting Viewer. -
Follow what you've learned in the points 1 to 11 to create a scripting viewer taking a column of strings, expecting to have nucleotide sequences in them, and plotting a Matplotlib's histogram with all amino acid triplets occurred within all of these sequences. As you may notice,
numpyandmatplotlibare already available for your Python scripting in Datagrok. Reuse them to finish this exercise.
Exercise 7: Transforming dataframes
Prerequisites: exercises "Setting up the environment", "Semantic types".
You will learn: how to apply test-driven development (TDD), how to join and union dataframes using the knowledge of semantic types, and display the result.
-
Make sure the prerequisites are prepared on your machine, including the package called
<yourFirstName>-sequenceAssure the package carries a relevant semantic type detector from the exercise "Semantic Types". -
Your task will be to implement a
fuzzyJoinfunction which takes two dataframesdf1anddf2, and does the following:- takes a first column in
df1which has a semantic type ofdna_nucleotide, let's say it iscol1 - takes a first column in
df2which has a semantic type ofdna_nucleotide, let's say it iscol2 - creates a dataframe
dfout ofdf1anddf2in the following way:- the rows of
df2are appended directly after those ofdf1, with data from both original columns merged into one resulting column — this is a UNION operation for dataframes, as in SQL; use the dataframe's.appendmethod - a new column
Countsappears indf, which contains:- for each row
Rfromdf1,R.countsis a number of matches of all the subsequences inR.col1of lengthNin all the sequences ofcol2 - symmetrically, same for each row from
df2— consider this as a fuzzy, programmatic JOIN of the two dataframes; usedf.columns.addNew,col.set(i, value)on a newly created column
- for each row
- the rows of
- displays
dfwithgrok.shell.addTableView
- takes a first column in
-
Add a function to the package as follows:
//name: fuzzyJoin//input: dataframe df1//input: dataframe df2//input: int N//output: dataframe result... -
Implement the
fuzzyJoinfunction. -
Implement test for
fuzzyJoinfunction:To make this, you will first need to write a test for the function (Test packages). Create a new file
fuzzy-join-test.tsin thetestsfolder of your package and add import to package-test file.To create test in
fuzzy-join-test.tsimporttestandcategoryfunctions fromlibrary/utilsto the file. You can use these functions to implement basic test:import {category, test} from '@datagrok-libraries/utils/src/test';import * as grok from 'datagrok-api/grok';import * as ui from 'datagrok-api/ui';import * as DG from 'datagrok-api/dg';category('Category Name', () => {test('Test Name', async () => {//Test's content});})Write a test that creates two dataframes with the columns with dna_nucleotide semantic type, use
fuzzyJoinfunction tyo join dataframes. After getting result appends the dataframes and calculates theCountscolumn. The test should check the existence of the appended columns. -
Deploy the package with
webpackandgrok publish dev. Unlike with the first exercise, where the package was built on the Datagrok server, in this one we locally build the package before sending it. In addition, webpack output helps find some syntactic errors in JavaScript. -
Launch the platform and run the test to check if you implemented the function correctly by Test Manager. If the test fails, fix the function and run the test again until it passes.
-
After the test passes, open the two files from
"Demo files":sars-cov-2.csvanda-h1n1.csv, and run the package'sfuzzyJoinfunction using one of the methods you've learned. The result for N=3 should look similar to: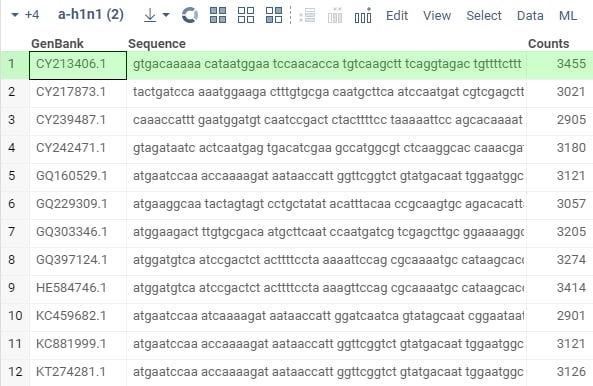 .
.
If the result is not the same as expected, fix the test so it reflects the correct behavior. After that, fix the implementation
of the fuzzyJoin function and run the test again. Repeat this process until the test passes.
- Read more about joining dataframes through the case reviewed at our Community Forum, and with a sample.
Exercise 8: Custom cell renderers
You will learn: render cells by semantic types.
Prerequisites: exercises "Setting up the environment", "Semantic types".
-
Navigate into the folder with your
<yourFirstName>-sequencepackage created in "Setting up the environment". -
Let's add a custom cell renderer for a nucleotide sequence box to represent our sequences in different colors. We need to use monospace font and render each nucleotide (
A,G,C,T) in a different color using on of the popular conventions, following this link. -
Add a class to
src/package.tsfor the new cell renderer:- Datagrok grid is rendered through an HTML5
Canvas. The grid's canvas is
g.canvas. Iterate through the resulting lines and bring them to ag.canvasin therendermethod withg.canvas.getContext('2d').fillText; learn more about HTML Canvas if it's new for you
export class NucleotideBoxCellRenderer extends DG.GridCellRenderer {get name() { return 'Nucleotide cell renderer';}get cellType() {return 'dna_nucleotide';}render(g: CanvasRenderingContext2D, x: number, y: number, w: number, h: number,gridCell: DG.GridCell, cellStyle: DG.GridCellStyle) {let seq = gridCell.cell.value;let ctx = g.canvas.getContext('2d');if (!ctx) return;ctx.font = '11px courier';// ...for (let i = 0; i < gridCell.cell.value.length; i++)ctx.fillText(/* ... */);}} - Datagrok grid is rendered through an HTML5
Canvas. The grid's canvas is
-
Add the below to
src/package.tsto make the new cell renderer part of the package://name: nucleotideBoxCellRenderer//meta.role: cellRenderer//meta.cellType: dna_nucleotide//output: grid_cell_renderer resultexport function nucleotideBoxCellRenderer() {return new NucleotideBoxCellRenderer();} -
Deploy the package as usual with
grok publish dev. In Datagrok, navigate to a file with nucleotide sequences from"Demo files", such assars-cov-2.csv. Verify you get the desired result, it should look similar to this: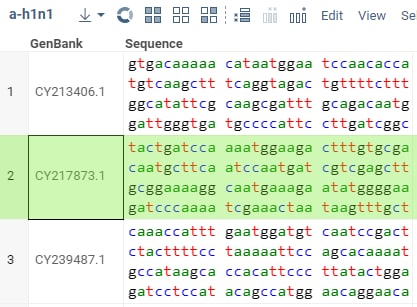 Change the "Sequence"
column width and rows heights with a mouse to see how sequence looks.
Change the "Sequence"
column width and rows heights with a mouse to see how sequence looks.
Exercise 9: Creating an info panel with a REST web service
We will use the ENA REST API to output sequences and associated data in the info panel, based on the ENA sequence ID contained in a currently selected grid cell.
-
Searching through the ENA archive, you may notice the sequences' IDs have a format of
[A-Z]{2}[0-9]{6}(two capital letters + six digits). Go to the detectors file of your package and add a detector which recognizes a string of this form and sets a proper semantic type to column://meta.role: semTypeDetector//input: column col//output: string semTypedetectENAID(col) {// returns semType 'EnaID', if name is of the form [A-Z]{2}[0-9]{6}} -
Use
fetchProxyto get a sequence for the potential corresponding ENA ID in fasta format. For example, this GET fetches the sequence for theID=AA046425:https://www.ebi.ac.uk/ena/browser/api/fasta/AA046425Use the following structure for the into panel function in yoursrc/package.ts://name: ENA Sequence//meta.role: panel, widgets//input: string cellText {semType: EnaID}//output: widget result//condition: trueexport async function enaSequence(cellText: string) {const url = `https://www.ebi.ac.uk/ena/browser/api/fasta/${cellText}`;const fasta = await (await grok.dapi.fetchProxy(url)).text();return new DG.Widget(ui.box(// ... the widget controls are composed here));}Incorporate a
textInputcontrol to display a sequence in a scrollable fashion. Add a caption to that text area to display an ENA's name for this sequence, which also comes in the fasta file. Use asplitVcontrol to nicely locate the caption at the top and the text area at the bottom.
fetchProxy mimics the regular fetch method of ECMAScript, but solves a
CORS limitation of JavaScript. In this panel, you'd query the
external domain from your web page, whereas CORS prevents you from querying anything outside a reach of your web page's
domain. Thus Datagrok provides a proxy facility in the neat fetchProxy wrapper.
Exercise 10: Enhancing Datagrok with dialog-based functions
In the previous exercises we've learned how the Datagrok function inputs are offered in a dialog window automatically once you run the function. In this exercise we find how to expand these dialogs with the behavior beyond simple arguments-to-inputs mapping.
So, in some previous exercises we've used the files a-h1n1.csv and sars-cov-2.csv which we prepared in advance.
These files contain ENA sequence ID along with the first 60 letters of the sequence by ID. Let's construct a
dialog-based function which forms such files automatically by a given search input. The search topic may be
coronavirus, influenza etc.
-
This
GETquery performs a text search in the EMBL database, returning alimitfirst results (10in this case):https://www.ebi.ac.uk/ena/browser/api/embl/textsearch?result=sequence&query=coronavirus&limit=10By the way, you could discover this API endpoint via a Swagger API navigator at this link. Let's assume the result we want is always of typesequence. Create a function_fetchENASequencewhich takes as parameters aqueryad alimitand returns a dataframe with two string columnsIDandSequence. Use this structure for dataframe construction:df = DG.DataFrame.fromColumns([DG.Column.fromList(DG.COLUMN_TYPE.STRING, 'ID', [ /* a list of IDs you've parsed from a ENA output */ ]),DG.Column.fromList(DG.COLUMN_TYPE.STRING, 'Sequence', [ /* corresponding list of sequences */ ])]);The output from
ebi.ac.ukis a raw text, and you need to parse it to extract both the ID and its associated sequence. Trim the sequence so that isn't longer than 60 characters. Use your previous knowledge aboutfetchProxyto do theGETquery. -
Make a function
formENADataTablewhich constructs a dialog giving the user a two-step process for constructing a dataframe with ENA sequence data in it.- First, the user can type in the query (
coronavirusis the default setting) and see the first 10 results in the grid right in this window after clicking the "Preview" button. Consider this as a preview before the actual dataframe is produced. - Second, when the user is happy with what's in the preview, he/she proceeds to the "Ok" button to get the actual
dataframe with the ENA data on the screen in the Datagrok's grid view. This table shall consist of the number of
rows the user chooses (
100set as a default).
Here is the code scaffold for the
formENADataTablefunction:let grid = DG.Viewer.grid(df);let limitInput = ui.input.int('How many rows: ', {value: 100});let queryInput = ui.input.string('Query: ', {value: 'coronavirus'});let button = ui.button('Preview', () => {/* Handle preview creation */});ui.dialog('Create sequences table').add(ui.splitV([ui.splitH([ui.span([queryInput.root]),button]),ui.div([grid]),ui.div([limitInput])])).onOK(() => {/* Handle table creation */// Display the resulting tablegrok.shell.addTableView(df);}).show();Re-use twice the
_fetchENASequencefunction you've prepared previously. - First, the user can type in the query (
-
In this first version we fetched
60characters for a sequence. Add a new text field calledSequence lengthto let the user specify this trim length, set it60as a default. -
Make your function set a proper semantic type for the
Sequencecolumn. -
(*) You may notice the sequences you get in this order are not too different. Add more diversity to these tables. For example, you can use the
offsetparameter of theGETquery.