Test packages
Testing is an essential part of development process. You should ensure that your product works properly at each stage of it's lifecycle. For instance, when developing a new version of a package you should perform regression testing and confirm that new changes haven't affected previous functionality. Each package should include a bunch of unit tests responsible for either UI or logic underneath. And Datagrok provides various capabilities and tools to conveniently run those tests any time during development.
The process of writing and executing tests can be significantly easier with the help of Datagrok library Utils, which contains a powerful set of testing utilities. From basic assertions to asynchronous handling and viewer testing, these utilities cover a wide range of testing scenarios.
Writing TestsUse the test function from Utils library to define individual test cases, assign names, and specify test logic. Tests can be categorized and executed collectively for comprehensive coverage.
Example
Within the Utils library, you have access to various test assertion functions to validate and compare different types of data. Functions like expect, expectFloat, expectTable, expectObject, and expectArray enable you to assert equality, floating-point number comparisons, DataFrame comparisons, object comparisons (including nested objects and arrays), and array comparisons, respectively.
Example
Simplify testing asynchronous code with the awaitCheck utility. It allows you to wait for a specified condition or timeout, making asynchronous test cases easier to handle. The delay function is also available for introducing intentional delays during testing.
Example
The testViewer utility is a valuable tool for testing Datagrok viewers. It facilitates thorough testing of viewer functionality, including dataframe transformation and serialization. By providing a DataFrame as input, testViewer allows you to examine how the viewer responds to various data scenarios, handling dataframe modifications such as row selection, data filtering, and column value changes. Furthermore, the utility validates viewer serialization by saving the viewer into a layout and loading it back, ensuring that viewers can accurately preserve their state.
Example
To test viewers with asynchronous rendering pass optional awaitViewer parameter to testViewer function. awaitViewer is a function which takes DG.Viewer as an argument and waits for it to be created and rendered. Create any custom behavior to ensure viewer initialization is completed. For instance, wait for some event to be fired or some element to appear in DOM.
Example
Ensure proper exception handling by using the expectExceptionAsync function. It allows you to test that specific actions throw the expected exceptions and offers the flexibility to perform deeper inspections of the exceptions when needed.
Example
You can find examples of tests by referring to the APITests package. This package contains a collection of test cases that can serve as illustrative models for your testing needs.
Local testing
Testing your packages locally before releasing them is made simple with the Datagrok tools. Follow these steps:
- Navigate to Package Directory: Start by navigating to your package directory using
cd <package-dir>command. - Execute Testing: Run the testing command:
grok test [--host]. This command builds your package and deploys it in debug mode for testing. You can specify the host using the--hostoption. The host should match one of the server aliases in your configuration file (.grok/config.yaml). If you don't provide a host, the default host for testing will be used. - Optional Flags: You can use optional flags to customize the testing process:
--skip-buildskips the build step.--skip-publishskips the publishing step.--csvsaves the report as a CSV file in your package folder.--guito see test execution in action. It disables the headless browser mode, aiding in test debugging.
If you do not have any datagrok instance run locally, you can use docker-compose to run the stand.
Trigger GitHub Actions manually
If an error occurred for the action triggered by the commit, it is possible to trigger the action manually.
- Use Packages workflow
- Run the Workflow:
-
Click on
Run workflow. -
Set the list of packages you want to test, separating them with spaces (e.g.,
Demo Tutorials). -
Choose the target branch you want to test against.
-
Finally, hit
Run workflowbutton.
Note that publish to the NPM registry is executed for the master branch only.
-
- Check that the GitHub Actions workflow finished successfully.
- The results are available in the actions output.
Troubleshooting failed tests in GitHub Actions
When a GitHub Action completes, you can access the Artifacts section on its main page (Summary), which contains a zip archive with the results of the tests for that specific action. This archive includes three important files that can help you diagnose and resolve the problems:
-
test-console-output.logcontains the console log records generated during the test execution, including error messages, stack traces, and debugging statements. -
test-record.mp4is a video recording of the test execution, which can be immensely helpful in scenarios where tests are failing occasionally or in cases where the issue is related to the user interface or some visual components. -
test-report.csvis a tabular representation of the test results. It contains information about which tests passed, which failed, and also additional details such as test duration or errors.
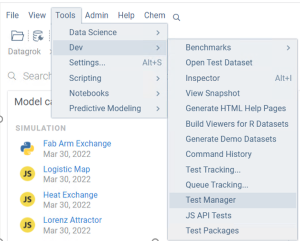
Test Manager
Test Manager lets you run package tests and review test results. Test Manager itself is a part of the DevTools package.
To start Test Manager go to Top menu -> Tools -> Dev -> Test manager
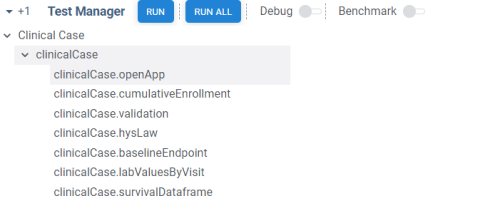
Application starts showing a list of all packages containing tests. Inside each package, tests are divided by
category. Categories support multiple nesting (subcategories should be divided by :). To select a test or a category,
click on it, or use keyboard.
Running tests
There are multiple ways you can run tests:
- by right clicking on package, category, or test and selecting
Runfrom context menu - by selecting package, category, or test and pushing
Enter - by selecting package, category, or test and pushing
Runon a ribbon panel - by selecting package, category, or test and pushing
Runon a context panel - individual tests can be run by double click
- you can run all tests at once using
Run allbutton on the ribbon - package, category, or test can be run by putting the corresponding url into address bar of the browser. The format is
the following
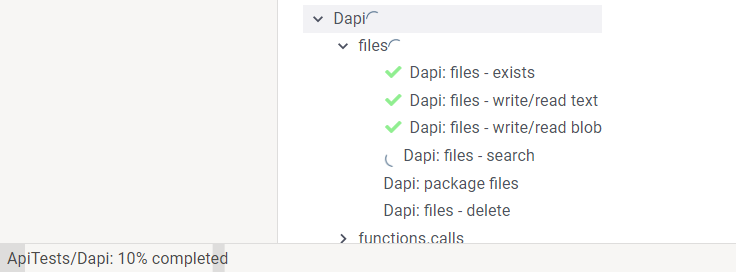
your_server_name/apps/DevTools/TestManager/package_name/category_name/test_name - Progress icon is shown opposite to active test/category/package, it will end up in result icon after completion. In case at least one test fails within category or package the fail icon will be shown.
Progress bar on the bottom of the page shows the percentage of completed tests.
Reviewing results
To explore results, select a test, category, or package, and information about results is available via tooltip or in the context panel. In case category/package contain multiple tests results are shown as a grid which can be added to workspace for further exploration.
Running tests in the platform console
-
Access the Console: To open the console, press the tilde key
~. Alternatively, enable the console from the toolbox by navigating toWindowsand selectingConsole. -
Run Tests by Category: To launch tests for a specific category, use the syntax:
PackageName:test(category="category-name")For instance, you can run tests for the "Layouts" category with:
ApiTests:test(category="Layouts"). -
Run Specific Tests: To run a specific test within a category, include the
testparameter. The format is:PackageName:test(category="category-name", test="test-name")For example, you can execute the test "ViewLayout.toJson()" within the "Layouts" category with:
ApiTests:test(category="Layouts", test="ViewLayout.toJson()").
Testing public package changes
It is always a good practice to test the changes before publishing the package.
All public packages in the repository are tested using GitHub Actions on every commit. For every changed package GitHub creates a new separate instance of Datagrok from the latest Datagrok docker image. Then, it publishes a new version of the package to this instance. And then, the tests are executed on it.
The results are available in the actions output.