Files
Datagrok lets you work with files and directories right from the web browser. It supports all popular file systems, including S3, Dropbox, Google Cloud Storage, Sharepoint, Azure, CoreWeave, and GitHub, as well as Windows and Linux network shares.
Once a connection is established, you can browse, preview, open, create, delete, rename, download, clone, and share files and directories.
When you sign up for Datagrok, a personal directory called Home is automatically created for you.
You can create custom connectors and read files programmatically.
Connecting to file storage
To connect to your file storage, follow these steps:
- Go to Data > Files.
- Open the New file share dialog (Toolbox > Actions > New file share). Alternatively, click the New file share icon on the Menu Ribbon.
- In the dialog, choose the data source from the Data Source dropdown. The dialog updates with connection-specific parameters.
- Set the parameters.
- Optionally configure [caching](#Caching files shares)
- Click TEST to test the connection, then click OK to save it.
This file share will only be available to you, until you share it with others users or groups.
Some connection parameters have unique characteristics, and it's important to specify them correctly:
- Directory path. When connecting to the root directory, leave the Dir field empty. Otherwise, enter a directory path.
- Credentials. You can specify credentials manually or using the Secrets Manager, such as the AWS Secrets Manager. When entered manually, Datagrok stores secrets in a secure privilege management system. To specify who can change the connection credentials, click the Gear icon and select from the Credential owner dropdown.
When connecting to public buckets in AWS S3, always check the Anonymous checkbox.
A connected folder appears in File Manager as a file share. Expand it to browse its files and subfolders.
Like other objects in Datagrok, newly created connections are only visible to the user who created them. To let others access the file share, you must share it (right-click the connection and select Share... from the list of options).
To modify a connection, right-click it and select Edit... from the list of options. To quickly create a connection similar to an existing one, right-click it and select Clone...
File indexing
File indexing lets you automatically extract metadata from files stored in your file shares. Once configured, Datagrok periodically scans the specified folders, runs the scripts you choose against each file, and saves the extracted properties. This metadata can then be used to search, filter, and organize your files.
Setting up indexing rules
To configure file indexing, the file share must first be saved. Then:
- Right-click the file share in Data > Files and select Edit....
- Go to the Indexing tab.
- Click Manage indexing rules... to open the indexing rules editor.
Alternatively, right-click the file share and select Indexing... from the context menu.
Configuring rules
Each indexing rule defines what to scan and how to process the files:
| Setting | Description |
|---|---|
| Folder | The folder within the file share to scan. Each folder path must be unique across rules. |
| Scripts | One or more scripts to run against each file. Scripts must accept a file input and produce metadata as output. |
| Schedule | A cron expression defining how often indexing runs. The minimum interval is one hour. |
| Subfolders | When enabled, the rule also scans all subfolders within the specified folder. |
| Enabled | Toggle the rule on or off without deleting it. |
You can add multiple rules per file share to index different folders with different scripts and schedules. Click Add Rule to create additional rules, and use the Save button to apply your changes.
How it works
On each scheduled run, Datagrok lists the files in the configured folder (and subfolders, if enabled), then runs the assigned scripts against each file. The scripts extract metadata such as content properties, tags, or computed values, which are saved as properties on the corresponding file entities. These properties then become available for searching and filtering in the File Manager.
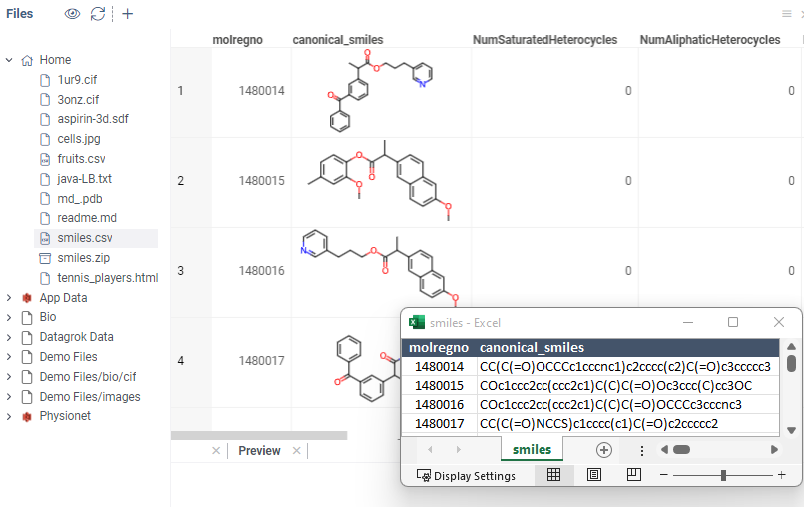
File Manager
File Manager allows you to manage connections, browse and preview file content, and perform standard actions such as opening, downloading, deleting, and renaming. Right-click on an object to see available context actions, or left-click and expand the Actions pane in the Context Panel on the right. Click on an object to see its preview. Double-click to open the object in the workspace.
If you don't see a certain action, it may be due to insufficient permissions. For files and folders shared with you, contact the credentials owner. If you are a credentials owner, contact the data source owner.
In addition to the hierarchical browsing, the File Manager offers advanced preview and data augmentation capabilities using Directory, Preview, and Context Panel.
The Directory section shows the contents of your current folder. Click a file to see its preview and properties, or right-click it for more actions. Use the search bar to search for files and folders within your current directory. The search bar allows you to search for items by name, file extension, or metadata.
For folders, the Preview generates a treemap that highlights the largest items. For files, the functionality varies based on the file's format and data properties. It includes custom viewers for supported formats, such as interactive spreadsheets for displaying tabular data, cell and image renderers, and chemical and biological structure viewers. You can also view the content of ZIP files and edit Markdown, TXT, and HTML files.
File preview is limited to files under 10MB. The platform won't display larger files. Unsupported file formats cannot be previewed, but you can download them. File upload is limited to 100MB if no explicit limit is set. Format-specific limits also apply: XLSX – ~80MB, CSV – ~536MB, XML – 10MB, D42 – 500MB, ZIP – 50MB.
You can develop custom file viewers, folder viewers, and content viewers as plugins.
Example: Create custom file viewers
In this example, a script is executed against the folder content. If the folder contains files that match the file extension parameter PDB, the Preview displays a custom NGL viewer to visualize the molecule.
To add a custom viewer, you have two options:
- Develop in JavaScript using the Datagrok JavaScript API.
- Use the visualizations available for popular programming languages like Python, R, or Julia.
To learn more about each option, see Develop custom viewer.
Example: Create custom folder viewers
The Context Panel provides additional information about a selected file or folder, and the ability to execute context actions. For example, when you click a CSV file, the Context Panel updates to show the file's metadata, available context actions, and other relevant information. If you subsequently click any of the dataframe's columns in the Preview, the Context Panel will update to display information and actions specific to that column, such as summary statistics for the column under Stats, or its data and semantic types under Details.
Context Panel can be extended. You can add custom info panes and context actions.
Example: Image augmentation
In this example, a Python script creates a custom info pane called Cell Imaging Segmentation. This script executes against JPEG and JPG files during the indexing process and extracts custom metadata (such as the number of cells) and performs predefined transformations (such as cell segmentation). When a user selects the corresponding image, the Context Panel shows a custom info panel that displays the augmented file preview and the number of detected cell segments.
Creating dynamic dashboards from files
Similarly to database queries, you can create and publish dashboards with a file as a data source. This file is re-read each time a dashboard is open (see also caching), providing you up-to-date data.
To create a dashboard with a file as a data source:
- From the file manager, double-click a file to open it.
- Design your dashboard using the built-in visualizations.
- Click SAVE on top to upload and share the project. The file loading script will be under the "Creation script" section.
Sharing the dashboard with a file as a data source also grants the "read" privilege to the corresponding file connection.
File sharing and access control
Datagrok lets you control who can access file shares, and grant them read or write privileges. You can share folders, including the root share, but not individual files. To share a folder, right-click on it, select "Share folder", specify users or groups, and the privilege (View / Edit). Once the folder is shared, it appears in the recipient's Files tree under Browse.
The privilege level determines what the recipient can do:
- Can view: View, open, and download.
- Can edit: Everything under "view", plus rename, edit, delete, and reshare
You can also share the folder's URL from the address bar with other users. This won't give them the necessary privilege, but it might be a convenient way of sharing links with people who already have proper privileges.
To inspect or quickly adjust access permissions to your file shares, send comments to those you're sharing with, and more, use the Sharing info pane in the Context Panel.
Caching
You can cache file share content, and set invalidation (flushing) schedule using cron expressions. Caching applies to all files reads and folder listings. Results are stored both in browser cache and server cache.
As an example, let's imagine you open a large CSV file from the cached folder in the morning. The first time you did it, it might take some time since the content has to be parsed and the data needs to be transferred over the network. The second time you open it later this day, it opens instantaneously since the parsed file is already in your browser cache. You colleague opens the file in the afternoon, and it opens faster than for you in the morning because the parsed (as a highly efficient and compressed binary format) CSV is cached on the server.
When the content of the folder is modified via the Datagrok API, the cache is flushed. You can also flush the cache manually by right-clicking on the connection and choosing "Clear cache", or programmatically.
You can also configure cache individually per file or folder:
- Right-click the connection, select Cache....
- Choose file or folder using Path field.
- Input valid cron expression using Cron expression field. You can use crontab.guru to validate your expression.
- Enable Preflight in order to perform additional check of file/folder version every time when it is accessed.
Resources