Creating a docker container
This document explains how to create a package that is capable of running docker containers on the Datagrok instance.
Overview
Datagrok enables users to incorporate a custom Docker container into their package and leverage it throughout the package's lifecycle. Users have the flexibility to use a custom image or an image from Docker Hub. When a custom image is used, Datagrok takes care of building and running it automatically.
Once a user publishes a package that includes a Docker image, Datagrok adds the image to the build queue and builds it. Additionally, Datagrok creates a Docker container instance that can be accessed via HTTP(s) using the Datagrok JS-API. Users can monitor the status of both images and containers in the Manage -> Docker view, which is useful for checking status or troubleshooting.
This system is cloud-agnostic and works with local instances using Docker Compose or AWS. The only requirement is that the grok-spawner container must be running in the same environment. Users can access the container via HTTP, but only one EXPOSE $PORT is allowed in the image.
1. Create a dockerfile
Before we start, get familiar with docker docs, which are related to the process of application containerizing.
Now, let's create a folder dockerfiles. You should put there a Dockerfile with
the commands that are needed to build a docker image and run the container.
Follow all the best practices for writing dockerfiles in order to make them
simple, small and efficient.
Example of such Dockerfile is located in PepSeA package.
2. Container Configuration
Each container can be configured using a container.json file, which must be placed in the same directory as the Dockerfile. This file defines resource allocation and container behavior.
Example container.json
{
  "cpu": 1.5,
  "gpu": 1,
  "memory": 2048,
  "on_demand": true,
  "shutdown_timeout": 60,
  "storage": 25
}
Configuration Properties
| Option | Type | Default | Description |
|---|---|---|---|
| cpu | Double | 0.25 | Number of CPU cores allocated to the container. |
| gpu | Integer | 0 | Number of GPU devices that should be reserved. |
| memory | Integer | 512 | Amount of RAM allocated in megabytes. |
| on_demand | Boolean | false | If true, the container starts only when a request is received. |
| shutdown_timeout | Integer | null | Time in minutes after which the container shuts down if idle. |
| storage | Integer | 21 | Allocated storage size in gigabytes. |
| shm_size | Integer | 64 | Shared memory size in megabytes. |
Usage
- Place
container.jsonin the same directory as theDockerfile. - Modify resource limits as needed before publishing the package.
For more details, refer to the example container.json
that is located in the Admetica plugin.
Note: Creating the configuration file is optional. If it is not provided, default values will be used.
3. Implement the function to get a response
Make sure that application inside Docker container has embedded HTTP server that handles requests and the listening port is exposed in Dockerfile.
3.1. Http request
Add code that is responsible for making a request to the container:
async function requestAlignedObjects(id: string, body: PepseaBodyUnit[], method: string,
  gapOpen: number | null, gapExtend: number | null): Promise<PepseaRepsonse> {
  const params = {
    method: 'POST',
    headers: {'Accept': 'application/json', 'Content-Type': 'application/json'},
    body: JSON.stringify(body),
  };
  const path = `/align?method=${method}&gap_open=${gapOpen}&gap_extend=${gapExtend}`;
  const response: Response = await grok.dapi.docker.dockerContainers.fetchProxy(id, path, params);
  return response.json();
}
To make a request grok.dapi.dockerfiles.fetchProxy is used. You should specify the id in order to make the request to the right container, path
and params of the request. The method logic it totally aligned with JavaScript Fetch API and params
is RequestInit object type.
To get id do:
const dockerfileId = (await grok.dapi.docker.dockerContainers.filter('pepsea').first()).id;
3.2. WebSocket connection
To make WebSocket connection to Docker container use grok.dapi.docker.dockerContainers.webSocketProxy method. You should specify the id of container
and path. You can also provide optional timeout for initial connection establishment. Function webSocketProxy returns WebSocket
when connection is ready.
Example
const ws: WebSocket = await grok.dapi.docker.dockerContainers.webSocketProxy(container.id, '/ws');
ws.send('Hell World!');

const onMessage = (event: MessageEvent) => {
 const message = event.data;
 console.log(message);
};

ws.addEventListener("message", onMessage);

setTimeout(() => ws.close(), 3000);
4. Build and publish
Run webpack and publish your package to one of the Datagrok instances:
webpack
grok publish dev
The return code should be 0 to indicate a successful deployment.
5. Managing Docker Containers and Images
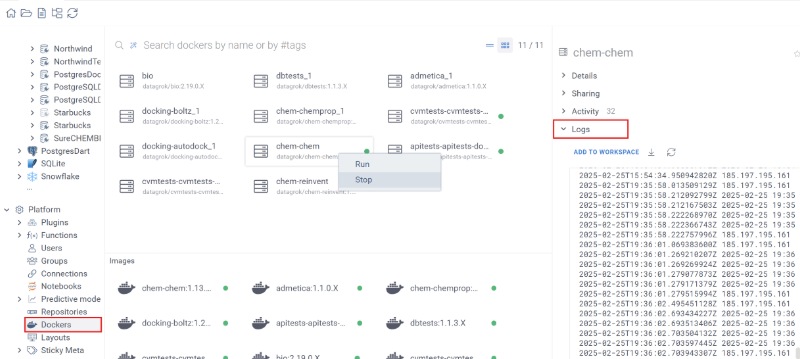
You can check available Docker containers and images using Browse. Go to Datagrok and open Platform -> Dockers.
The opened view has two sections: Docker Containers (top) and Docker Images (bottom). Each section contains cards that correspond to a container or image. From this view, you can check the container and image status, which is reflected with a colored dot inside the card:
- Green dot: The container or image is running or ready.
- Red dot: An error has occurred.
- Blinking grey dot: The container or image is in a pending state (either starting, stopping or rebuilding).
- No dot (only for Docker container cards): The container is stopped.
You can check container logs or image build logs from the Property pane. To see them, click on the desired card, open the Property pane, and select Logs (for containers) or Build logs (for images).

Note: You can start or stop a container, rebuild an image, or download the full context by right-clicking on the corresponding card.
See also: